|
|
Post by Hope C. on Mar 23, 2010 13:06:28 GMT -5
I wasn't sure where to put this since it's the first time I've ever done anything with photoshop... and not really what I would call significantly altered, but I'm curious what you all think. I saved it about two seconds before the power went out at the college and killed the computer. It's for an assignment where we have to do a photoshop tutorial and present it to the class. I know his left ankle needs to be in front of the frame, but I can't fix it until the power at the college is back on, and God knows how long that will take.  |
|
|
|
Post by Saknika on Mar 23, 2010 13:13:22 GMT -5
I REALLY like the idea! Really and truly! And yes, this is the right board for it. My big nitpick right now though is to smooth out those edges on the outside of the frame. They're choppy and very not-visually-pleasant. But man, that's an awesome piece right there!
|
|
~Hero~
Weekend Photographer


Posts: 49
|
Post by ~Hero~ on Mar 23, 2010 21:25:31 GMT -5
Wow, this is really, really good if it really is your first time using photoshop. I agree with Saknika, the only thing that's really bothering me is the edges. The picture itself is definitely cropped really nicely though.
|
|
|
|
Post by ŋєт™ on Mar 23, 2010 22:49:31 GMT -5
I concur with the above posts, but bravo on this for real...you did good  |
|
|
|
Post by Hope C. on Mar 25, 2010 20:26:11 GMT -5
Better? 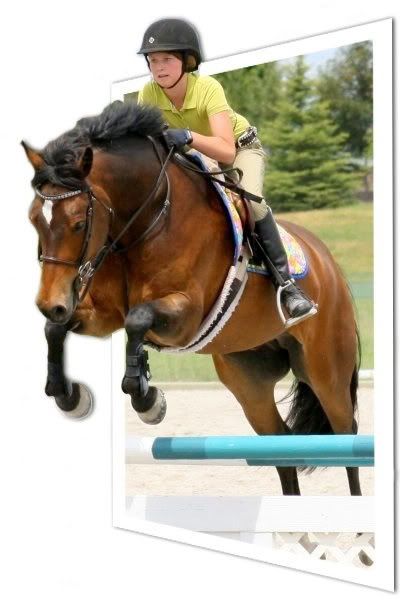 |
|
|
|
Post by Saknika on Mar 25, 2010 20:35:49 GMT -5
MUCH! Nicely done!
|
|
|
|
Post by MarianMurdoch on Mar 27, 2010 20:01:40 GMT -5
I definitely like the second version better and this is a KILLER idea. Very well done. Be careful with the edges like along the horses nose, ear and mane. Since you removed the gray outline, that area now seems fuzzy. Are you using a fuzzy brush or one with clear edges? I'd love to hear your tutorial. Did you youtube it? |
|
|
|
Post by Hope C. on Mar 27, 2010 22:10:28 GMT -5
Honestly, I just made it up. I'd done some with gimp and some other editing programs and sort of knew a little what I was going for after seeing some pictures with a similar idea to this with other subjects on Worth1000... so I just winged it. I'd also done a little with photoshop on other things, but never with photos. Basically I just took the picture and made a clipping mask to go along with it, then made a second layer, drew the rectangle about where I wanted it on the horse, selected the inside of the rectangle, rasterized the layer, and cut out the selected part of the rectangle. From there I "transformed" (I think that's what it was...) the rectangle with the perspective option, then resized it to where I wanted it to be on her shoulders and his neck. Once that was done I went back to the photo layer's clipping mask and did a basic outline of the horse and frame with the brush tool before zooming in to get the edges nice and close. Once the untwanted background was removed I merged the two layers and created the drop shadow, and that's pretty much it... I sort of just played it by ear. I'm sure there is some tutorial somewhere on how to do it, but I like to figure things out for myself. As my riding trainer put it when I saddled up Vincent and took him out cross-country without her there today (the first time in my life doing any form of cross-country or jumping outside the arena) after only riding English for 3 months, "put an idea in her head and there's no stopping her." Thankfully, most things I do don't involve galloping a 16.2 hand thoroughbred outside in the wind over 2 ft log jumps, otherwise I'm sure I'd be a regular in the hospital  I used a brush with clear edges, but I did it in the 10 minute gap between my Design for Graphic Communications class and my Art History mid-term, so I wasn't quite as meticulous about the edges on the horse in second one as I was with the first. One of these days I'm skipping art history so I can stay in the mac lab and spend more time in photoshop until my brother in law sends me his CS2 (since he upgraded to CS4 last year)... who needs art history anyway? |
|